Showing posts with label dessert. Show all posts

Tuesday, December 27, 2011

Deep Dish Chocolate Chip Cookie Pies

Please excuse my absence, I've been in such a cooking funk the last two weeks.  I don't know what happened this year but Christmas snuck up on me and somehow it was the week of and I hadn't finished my shopping and I hadn't made any baked goods or candy and I hadn't been cooking.  When I finally did hunker down and decided to make a soup, it was a TOTAL fail and my hopes were destroyed and my funk returned. 
But I somehow found a little motivation to makes these little pots of goodness one night when I had my mom and stepdad over for dinner. I love a good chocolate chip cookie, don't you? And what's better than a chocolate chip cookie? One that's in a little ramekin and about 5 times thicker than a cookie, add a scoop of ice-cream on top and dig in! Next time you want chocolate chip cookies make these deep dish cookie pies....YUM :)
You can use your favorite chocolate chip cookie recipe and if you don't have one, try my favorite. I hope everyone had a wonderful Christmas, I sure did.  Did you get anything fun and exciting? I'd love to know, especially if it's food/cooking related but even if it's not :)  I got an ice-cream maker attachment for my mixer and I don't care if we are snowed in this winter, I'll be making ice-cream and sharing those experiences with you!

Deep Dish Chocolate Chip Cookie Pies
Adapted from: Blue Eyed Bakers
Printable Recipe


Ingredients:

2 cups plus 2 tablespoons (10 5/8 ounces) unbleached all-purpose flour
1/2 teaspoon baking soda
1/2 teaspoon salt
12 tablespoons (1 1/2 sticks) unsalted butter, melted and cooled until warm
1 cup packed (7 ounces) light or dark brown sugar
1/2 cup (3 1/2 ounces) granulated sugar
1 large egg plus 1 egg yolk
2 teaspoons vanilla extract
1-1 1/2 cups semisweet chocolate chips

Directions:

Preheat oven to 375 F.

Whisk the flour, baking soda, and salt together in a medium bowl; set aside.

Either by hand or with an electric mixer, mix the butter and sugars until thoroughly blended.

Beat in the egg, yolk, and vanilla until combined.

Add the dry ingredients and beat at low speed just until combined.

Stir in the chocolate chips to taste. 


Fill ramekins 3/4″ deep with raw, room temperature cookie dough. 

Set ramekins on baking sheet and  bake on the middle rack of the oven for 13-16 minutes, or until the top is just slightly golden brown. 

These are best if the cookie is just under-done.

Top with vanilla ice cream and serve.

Monday, December 12, 2011

Blackberry Cobbler

Can you believe there are people living among us that have never had cobbler? More baffling, people who have never heard of cobbler?  Call me ignorant but I didn't know that cobbler was a "southern" thing until a few years ago.  My old boss who is from Pennsylvania had never had cobbler and didn't know what it was.  I was completely shocked and appalled!
How can it be that someone had went their whole life without cobbler? I grew up on peach, cherry, apple, and blackberry cobbler.  It was a staple in my diet quite frankly and the most popular dessert at all family functions.  In fact, this particular cobbler that I truly love, I boycotted for about 2 years.  My mom made this cobbler for a family gathering and for at least a year she was asked to bring it to EVERY family function, gathering, birthday party, etc.  I was dreaming in blackberries and if you really could turn into what you eat I would have been a blackberry.  I actually got sick of this dessert for awhile and refused to eat it for about 2 years but now I'm back on the bandwagon.
Like my corn pudding, this was another dish I made when I first started cooking.  It's a real confidence booster in the kitchen and people are so impressed with the lattice crust...Suckers, they don't know how stinkin' easy this is to make. Next time you sign up to bring dessert, try out this cobbler.


Blackberry Cobbler
Printable Recipe

Ingredients:

2 bags frozen blackberries, thawed*
1 cup sugar
4 tablespoons flour
2 pie crusts (homemade or store bought)
1 egg, beaten (for egg wash)

*I sometimes forget to thaw the blackberries and it works fine if they are still frozen.

Directions:

Preheat oven to 400 degrees F.

In a large bowl, mix the blackberries, sugar, and flour.

Spray a round baking dish with non-stick spray and place 1 pie crust in bottom then add blackberry mixture.

Cut 1 pie crust into 1-inch strips and lattice over blackberries.*

Brush top of cobbler with egg wash.

Bake for 1 hour or until crust is golden.

Allow cobbler to cool at least 1 hour before serving.

*Click Here for step-by-step photos on how to make a lattice crust.

Tuesday, November 29, 2011

Chocolate Pecan Pie

Life is so funny, or maybe irritating is a better word. Do you feel this way? I just wrote about how I never leave dirty dishes in my sink in this post, but I lied...I had to leave dirty dishes in my sink last week. I made these marshmallows for my Thanksgiving sweet potato casserole and since it was 10pm I let the dishes soak with the intention of cleaning them in the morning. Well, I got up and no more had I let Greta out and was starting on those dishes when I heard my cell phone ring. I got called into work early and needed to be there in 20 minutes, so the dishes had to wait.
On my drive to work, my skin was crawling and all I could think about were those dang dishes and how much I was going to hate walking in the door from work and having them waiting there.  Much to my surprise, when I came home from work the dishes were done! SAY WHAT!!!???? At first I thought Steve had done them, since it was a rainy day he didn't go into work until later in the morning. Nope, wrong! It was my Mommy! She had to pick up my Thanksgiving turkey for me and when she dropped it off she let Greta out AND washed my sink full of dirty dishes! Have I told you how much I love my mom? She's truly the best.  Made my long crappy day at work fade away...
Instead of doing dishes I made this pie! Steve doesn't like pumpkin so I made chocolate pecan pie and blackberry cobbler for Thanksgiving dessert. I loved this pie and will definitely be making it again, probably for Christmas. 
 
Chocolate Pecan Pie
Source: The Kitchen Sink
Printable Recipe

Ingredients:

4 ounces semisweet chocolate
4 large eggs, lightly beaten
1 1/2 cups agave nectar (or honey)
1/2 cup sugar
1 teaspoon vanilla extract
1/2 teaspoon salt
1 pie crust (homemade or store bought)
1 cup chopped pecans

Directions:

Preheat oven to 350 degrees F. 

In a heatproof bowl set over a medium saucepan of simmering water, melt chocolate.  Make sure you stir chocolate occasionally, until smooth.  Set aside.

In a medium bowl, stir together (do not whisk) eggs, agave nectar (or honey), sugar, vanilla, and salt.

Stirring constantly, gradually add melted chocolate then pour filling into prepared crust.

Place pie plate on a baking sheet and cover the top of the pie with pecans.

Bake just until set (filling should jiggle slightly when pie plate is tapped), 50-60 minutes.  Let pie cool completely on wire rack (4 hours or overnight) before serving.

 Make sure to keep a few pecans aside so you can munch on them while the pie's baking :)

What was your favorite Thanksgiving dessert this year?


Thursday, November 17, 2011

Apple Cheese & Pear Cheese Danishes

Apple Cheese Danish
I've never eaten a pear.  Well, let me say that again...I've never eaten a pear since I can remember eating.  I'm sure when I was a baby my mom fed me that pureed garbage stuff.  I don't really know why I haven't had one, I love pear scented lotion and hand soap.
Pear Cheese Danish
I love almost all fruits but I NEVER eat those fruit cups with the juice. YUCK!!!!  The only fruit I will eat from a can with juice is pineapple.  I guess it's a texture thing; I feel like canned fruits that are in the juice seem limp, soft, and mushy.  I like my fruit firm, like when you bite into a fresh peach, apple, maybe even a pear.?
This fall I have seen multiple pear recipes that look yummy so when I went to the grocery I picked myself up some pears. I couldn't decide which recipe to make until I saw this post and decided to make an apple danish and a pear danish.  They were both great!

Apple Cheese & Pear Cheese Danishes  
Adapted from: A Cozy Kitchen
Printable Recipe 

Yield: 2 danishes

Ingredients:

8 ounces cream cheese, room temperature
3 tbsp. ricotta
juice of 1 lemon
1/8 tsp. Kosher salt
1/2 tsp. vanilla extract
5 tbsp. sugar, divided
2 Gala Apples (or 2 Pears)
1/2 tsp. cinnamon
1 box frozen puff pastry, defrosted

Directions:

1. Preheat oven 400 degrees F.

2. In the bowl of a stand mixer, add cream cheese, ricotta, vanilla, salt, and 4 tbsp. sugar. Mix until      smooth with paddle attachment. 

3. Peel and slice your apples or pears into 1/4 inch slices and toss with 1 tbsp. sugar, 1/2 tsp. cinnamon and juice of 1 lemon in a bowl with a wooden spoon.

4. Unfold 1 sheet of puff pastry and roll into 11 inch by 8 inch rectangle with a floured rolling pin.

5. Place puff pastry on parchment paper and place on cookie sheet.  At an angle, slice off the top corners of pastry and cut two notches in the bottom.  Cut 1 inch strips diagonally down both sides of puff pastry, making sure to leave center intact.  You should have about 8 strips per side. (Check out A Cozy Kitchen for step-by-step photos.)

6. Add half the cream cheese/ricotta mixture to center of puff pastry and spread out evenly.  Top with slices of apple or pear.

7. Fold in the bottom and top flaps of pastry then braid the side strips.  Brush danish with egg wash and sprinkle with sugar and cinnamon.

8. Refrigerate pastry 15 minutes until baking.  Bake 20-23 minutes or until danish is golden brown. 

9. Repeat steps 4-8 with second piece of puff pastry.

Grab some fruit at your grocery and makes some yummy fruit and cheese danishes :) These were great right out of the oven and even the next morning for breakfast, just pop 'em in the microwave about 15 seconds.

Sunday, September 18, 2011

Banana Bread

Since today is my good friend, Brittany's Birthday I thought I would share one of her recipes.  Besides, is there any better way to use those overly-ripe bananas but to make a quick bread?  I think not.  If you think you can't cook or bake, you're wrong.  For those of you reading this that feel it takes some sort of supernatural talent to bake or you want to boost your kitchen confidence...make this bread!  I'm telling you it's the easiest thing and it never fails! 

This is my friend, Brittany's recipe for banana bread but I added cinnamon to mine-which is why it's a little darker than normal banana bread.  The bread is great without cinnamon but since I love it so much, I add it to just about everything I bake.  :) You can also add walnuts to this recipe but I really prefer it without, but that's just me. 

Banana bread is something I like for breakfast, with my lunch, or for dessert :) It's very versatile in my opinion.  My favorite is to barely warm it in the microwave and spread some cream cheese on top...YUMMY!


Banana Bread   
Printable Recipe

Yield: 1 loaf

Ingredients:

3 or 4 ripe bananas, mashed
1/3 cup melted butter
1 cup sugar
1 egg, beaten
1 tsp vanilla
1 tsp baking soda
1 tbsp cinnamon(optional)
pinch of salt
1 1/2 cups flour (all purpose)

Directions:

Preheat oven 350 degrees F.

Prepare loaf pan by spray with non-stick spray.  I also line the bottom of mine with parchment paper.

Mix all ingredients with a wooden spoon*, adding flour last.

Bake for 1 hour or until toothpick comes out clean when inserted in the middle.

Allow bread to cool completely before inverting pan onto a plate then sprinkle a little sugar on top for some extra sweetness.  

*I'm not sure if using a wooden spoon really matters because I've never tried it without :) It's just one of things where I know the wooden spoon always works so why take a chance.  Next to my iron skillet, a wooden spoon is probably my next invaluable kitchen tool.  If for some crazy reason you don't have one, go get one!

Friday, September 9, 2011

Gooey Brownies

As usual, I got bit with the "baking bug" around 9:30 pm one evening.  After searching through a cookbook and my pantry I decided to make something easy with a box of brownie mix that was about to expire.  This was one impromptu baking experiment that resulted in a tasty new discovery that I will revisit often!  These are probably my favorite brownies now :)
 
Like most things I make, you can tailor this recipe to suite your tastes and what you already have on hand.  If you don't love caramel (I'm not sure how you couldn't) you could just fudge sauce or add nuts instead of chocolate chips or use semi-sweet chips instead of milk chocolate.  It's a "whatever floats your boat recipe"....


Gooey Brownies
Printable Recipe 

Yield: 8x8 dish, 3/4 inch thick brownies

Ingredients:

1 box brownie mix & ingredients listed on box
1/2 cup caramel sauce
1/2 cup milk chocolate chips

Directions:

Preheat oven to temperature suggested on brownie box (usually 350 degrees F)

Mix brownies as directed on box recipe then add caramel and chocolate chips

Pour brownie mixture into prepared 8x8 baking dish*

Bake as directed on box or until cake tester comes out clean when inserted into middle of brownies. 

Cool completely on wire rack then cut into squares and serve

Keep stored in an air tight container


*I like my brownies really thick and chewy so if making in 13x9 dish I would use 2 boxes of brown mix and double the caramel and chocolate chips. 


Wednesday, September 7, 2011

Chocolate Caramel Cheesecake


Steve's Birthday was last Thursday and he requested a cheesecake.  I bought The Gourmet Cookbook (for $7.00!!!!!) and had been wanting to make something from it so this was the perfect opportunity.  Let me just tell you that purchasing this cookbook was the best $7.00 I have EVER spent! I should also mention, this is the only thing I've made from the cookbook so far :)  That's just how good this cheesecake was!
  
I don't reccommend cutting too large a slice, you won't be able to eat it.  This cheesecake is so decadent and rich..just a sliver is enough to satisfy, although in about an hour you'll want another piece :)  Next time you need to make something special for someone special, try this cheesecake!  

I was so impressed with the ease of the recipe, I cannot wait to try many more from The Gourmet Cookbook.  The day it came in the mail, I spent my whole evening flipping through the 935 pages of recipes, writing down all the ones that I felt were a "must try".  I'm glad this cheesecake was the first, but it certainly won't be the last!  I think the price has went up to about $15.00 on amazon.com but I would gladly purchase it at that price.  My only negative on the cookbook is that there aren't any photos :( I really love photos but I understand why they couldn't photograph every recipe, the book would be 1000's of pages.  
Chocolate Caramel Cheesecake 
Printable Recipe 
Source: Gourmet Cookbook pg. 757 (cheesecake only)

 
Chocolate Graham Crust*:

1 cup finely chopped chocolate graham crackers
4 tbsp (1/2 stick) unsalted butter, melted
1/4 cup sugar

Combine all ingredients

Press mixture into bottom of 9-inch spring form pan and about 1-inch up the sides of pan

Place in refrigerator until ready to use


*This is my crust recipe, there is a regular crust recipe in the Gourmet Cookbook

Cheesecake Ingredients:

1 cup sugar
3/4 cup heavy cream
8 ounces bittersweet chocolate, finely chopped
1/2 cup sour cream
3 (8 oz) packages cream cheese, softened
4 large eggs
1 tsp vanilla extract

Directions:

Put rack in middle of oven and preheat to 350 degrees F.

Cook sugar in a dry heavy-bottom sauce pan (3 1/2-4 qt pan) on medium low heat.  Stirring slowly with a fork, cook until melted and pale golden.

Continue to cook without stirring, swirling the pan occasionally, until deep golden. 
caramel

Immediately remove pan from heat and carefully add heavy cream.  Mixture will steam and caramel will harden.

Cook over medium low heat, stirring until caramel is dissolved. 

Remove from heat and whisk in chocolate until smooth.

Add sour cream.
yummy chocolate/caramel sauce

Beat cream cheese in stand mixture (or with hand-held) until fluffy.

Reduce speed to low and add chocolate mixture. 

Add eggs, one at a time and scrape down bowl as needed.

Add in vanilla extract.

Pour mixture until spring form pan and bake 55 minutes or until edges are set, the middle will still be a little wobbly.

Run a thin knife around the edges to loosen cake then place on wire rack to cool completely.

Cover loosely with plastic wrap and put in refrigerator at least 6 hours. 

Remove side of pan and transfer to cake plate, serve.

This cake will keep covered in refrigerator up to 1 week, but I doubt it will last that long!

YUM!

Saturday, August 20, 2011

Gooey Chocolate Caramel Cake

I made this cake last week for a co worker's Birthday. It's one of my favorite desserts and since I had forgotten to ask what he wanted me to make, this is what he got :)  I've made this cake more than any other dessert and it always turns out great and everyone loves it.  Although it's not made from scratch, it's a crowd pleaser and everyone will want to know how you made it-which is one reason I always keep the ingredients on hand.  Since I took this to work, I wasn't able to get a picture once it's sliced-so you don't get to see the yummy gooey caramel that will pool on your plate :) But trust me, it's delicious! 


I usually call this the "cake with the holes" but that doesn't really describe what it's made of so I renamed it for this post.  I can't remember who this recipe originally came from but my mom has made it since I was a child and it's often what I request for my Birthday cake.  It was also the first dessert I managed to make all on my own!  
Gooey Chocolate Caramel Cake
Printable Recipe 
 
Ingredients:

1 chocolate cake mix (I used devil's food)
1 can sweetened, condensed milk
1 can caramel sauce, set aside a few tbsp. to drizzle over top cake
1/2 cup chocolate chips (I used milk chocolate because that's what I had but semi-sweet is good too)
1/2 cup heath brittle*
1 package cool-whip, thawed

*If your store doesn't carry the heath brittle in a bag just crush 2 or 3 bars

Directions:

Cook cake by box directions in 13x9 baking dish

Allow cake to cool completely then grease (I use non-stick cooking spray) the end of a wooden spoon that has a round handle and poke holes in cake, about 1/2 inch apart.  If you don't have a wooden spoon with a rounded handle, you can use a tooth pick or cake tester and just make a circular motion to make larger holes. 
I forgot to grease my hole-maker...oops!

Mix caramel sauce and sweetened condensed milk and pour over cake. 

Place cake, covered, in refrigerator over night (you don't have to do this step but it allows the cake to really absorb the sauce and tastes best this way).

Spread cool-whip topping over cake evenly and sprinkle with chocolate chips, heath brittle, and caramel sauce.
You can keep this cake stored in the refrigerator, covered, up to 3 days but I HIGHLY DOUBT it will last that long :)  Next time you need a quick, easy, DELICIOUS dessert, make this cake! I guarantee you won't be let down.

Wednesday, July 27, 2011

Peanut Butter Honeycomb Pie


When I got the August bon appetit magazine in the mail last week I thought I would be making the Blackberry & Lime Meringue Pie because the picture on the cover was incredible! That all changed when I flipped through the pages to find the Peanut Butter Honeycomb Pie.  I still want to make that Blackberry pie but I have my priorities and peanut butter is first!

This pie was really easy to make and looks quite impressive as well.  The recipe has a homemade pie crust but I had 2 store bought ones in my pantry that I needed to use so I allowed myself the luxury of being lazy and didn't make the homemade version. The pie was still good...just ask my co-workers, they seemed to enjoy it. 

I will be making more of the Honeycomb candy just to eat.  WOW, that stuff is awesome. The whole time I was waiting on the pie to chill I ate the candy by the handfull :)

Peanut Butter Honeycomb Pie 

Printable Recipe 

Servings: 8

Ingredients:

Filling
8 large egg yolks
12 tbsp sugar, divided
1 1/2 cups whole milk
1 vanilla bean, split lengthwise
3/4 cup unsalted butter, softened
1 cup creamy peanut butter
2 tbsp powdered sugar
1/2 tsp kosher salt

Topping
2 oz. bittersweet chocolate, chopped
2 1/2 tbsp unsalted butter
Honeycomb* (recipe below)
1/4 cup roasted, salted peanuts

Directions:

Filling
Mix yolks and 6 tbsp sugar in the bowl of stand mixer with whisk attachment.  Beat at high speed until ribbons form, stopping once to scrape down sides of bowl, about 2 minutes.

Combine milk and remaining 6 tbsp sugar in a large saucepan; scrape in seeds from vanilla bean and add bean.  Bring to a boil, stirring to dissolve sugar.  Remove bean.

With mixer running, gradually add hot milk mixture to yolk mixture.  Scrape mixture back into pan. Clean bowl.

Whisking constantly, bring to a boil over medium heat.  Remove pan from heat; whisk vigorously for 1 minute.

Return custard to mixing bow; beat on high speed until cool, about 4 minutes.

Mix in butter one tbsp at a time. Add peanut butter, powdered sugar, and salt; beat to blend. 

Scrape filling into cooled crust; smooth top.  Chill until set, 2-3 hours.

Topping
Stir chocolate and butter in a medium bowl set over a saucepan of simmering water until melted and smooth.

Drizzle some of the chocolate glaze over the peanut butter filling, making a circle in the middle of the pie and leaving 1-2 inches plain border.  Pile pieces o honeycomb and salted peanuts on top then drizzle more chocolate glaze over.
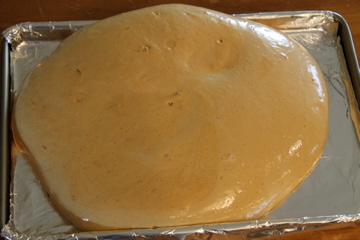
Honeycomb


1 1/2 cups sugar
3 tbsp corn syrup
1 tbsp honey
1/4 cup water
1 tbsp baking soda, sifted

Line a baking sheet with parchment paper or foil. 

Combine sugar, corn syrup, honey, and 1/4 cup water in a heavy deep saucepan.

Stir over medium-low heat until sugar dissolves.

Increase heat to high; bring to a boil.  Cook without stirring, occasionally swirling pan and brushing down sides with a wet pastry brush, until sugar turns pale amber. 

Working quickly, add baking soda-mixture will foam dramatically.

Immediately pour candy over prepared baking sheet and do NOT spread out.  Allow to cool at least 20 minutes.

Hit candy in several places with the handle of a knife to crack into pieces. 


Source: bon appetit Aug. 2011 page  82

Oh, if you want to make the crust in the mag, click here

Tuesday, July 19, 2011

Nutella Fudge Brownies

I fell in love with Nutella back in March when we were vacationing with my brother & sister-in-law.  My niece, Kennedy (she's 2) eats a Nutella sandwich every morning.  I hadn't tried it before but it smelled amazing so I had a spoon full and fell in love.  Steve takes a Nutella and peanutbutter sandwich everyday with him to work :) 
I've found so many great sweet treats that you make with Nutella but I hadn't tried any until this weekend. This one was by far the easiest and the one with ingredients that I already had so here they are! Try 'em, they're great and super quick.  The original recipe was half of what I have below and you were supposed to make them in a mini-cupcake tin. I don't have a mini-cupcake tin so I wanted to put them in a traditional brownie form.


Nutella Brownies
Printable Recipe 
Adapted from:Wenderly

Ingredients:

1 cup Nutella spread
2 large eggs
10 tbsp flour
1/4 tsp cinnamon


Directions:

Preheat oven to 350 degrees F.

In a medium or large bowl, whisk Nutella and eggs until smooth.  Add in flour and cinnamon and mix until combine.

Pour batter into a prepared 8x8 baking dish.*

Bake 18-23 minutes or until a toothpick comes out clean when inserted into the center.

Cool completely on a wire rack.  Cut into squares and serve! ENJOY!!

*I like to spray my pan with non-stick cooking spray then I line it with parchment paper (with 2 inches coming up the sides on 2 sides) so it's easy to lift the brownies out of the pan.   

Friday, July 8, 2011

Raspberry Crumble Bars

Some of my favorite childhood memories are from weekends at my grandparent's home in the country.  They had a HUGE raspberry bush and I would spend hours picking berries and taking them to my granny so she could make jam.  I never accumulated many berries though; I always ate them as I picked...I eat them until I had a stomach ache :)  My granny's jam was amazing and I miss that raspberry bush-it's long since gone. 

Although these raspberries came from the store and not my grandparent's, these bars were still delicious.  The original recipe says to make them in a 13x9 baking dish but I made mine in a 9x9.  I really love raspberries and wanted the raspberry layer to be extra thick and tart. These crumble bars are so yummy- I cannot wait to make more.  Actually, this was my third attempt at making them-I bought raspberries on two previous trips to the grocery and each time I ate all the berries within a day or two and never got to make the bars :) I have no self control when it comes to fresh fruits, what can I say? I love them! You could use any berry or fruit you wanted, if by some crazy chance you don't like raspberries. 

Raspberry Crumble Bars

Adapted from:  Annie's Eats

Printable Recipe 

Yield: 1 pan (9x9)

Ingredients:
1 1/4 cups sugar
1 tsp baking powder
3 cups all-purpose flour
1/4 tsp salt
zest of 1 lemon
16 tbsp COLD unsalted butter, cut into small pieces
1 egg
12 oz (2 containers) fresh raspberries
4 tsp cornstarch
juice of 1 lemon

Directions:
Preheat oven 375 degrees F.

Prepare 9x9 baking dish by buttering inside and lining with parchment paper (allow 2 inches to come up over 2 sides for easier lifting from pan).
In a large bowl mix: 1 cup sugar, baking powder, & flour.  Mix salt and lemon zest with a fork.

Cut in butter and egg with pastry blender until pieces are the size of a pea. 

Place half the crumble mixture in pan and press down with hands until flat and surface is even.

In a small bowl whisk cornstarch and lemon juice.  Fold in raspberries and pour them on crumble crust.

Cover raspberries with the remaining crumble mixture. 

Bake 40-50 minutes or until top is slightly golden brown. Allow to cool completely then cut into squares & ENJOY!!

Monday, June 20, 2011

Another Fail & Semi-Success?


Well, I said the point of this blog was to share my success and FAILURES with you so I'm keeping that promise.  On Easter I decided to give this cake a go.  As you can see above (and below) it was an EPIC fail!  I had never made any kind of roll cake before and since I woke up early that morning and had nothing to do until we went to my mom's for dinner (dinner in the south=lunch to everyone else) I got to work on this bad boy.
I thought I had been so careful with making this: I had taken my time and given myself what I thought was enough time for it to cool before rolling.  WRONG!  When I started to roll, things seemed to be okay.  You see you roll this twice and the first time it went just fine.  I then unrolled it (with only one small crack) then re-rolled with the filling and that's when it all went to down the drain.  You see, you have to account for the center of the cake (the part you can't really feel when you put your hands on top to see if it's still warm) to cool..DUH!!!!!!! I thought 1+ hours was enough for my cake to have cooled but OBVIOUSLY I was totally wrong!

Here are a few picture from before the disaster happened:

lookin'good

still lookin' good
heart breaking :(
But, I saw this as a challenge and gave it another go....


What better day to re-attempt this cake than on Father's Day? Actually there is no specific reason I chose this day....it just happened to work out that I had time to do some baking.  So, just like my first attempt everything went just fine and dandy.  Once I thought the cake had time enough to cool, I waited another hour longer just to ensure it would be cool enough! I know that seems like a long time (2 + hours for a cake to cool) and perhaps you won't need this long, but I was taking NO chance this go around.

I did change a few things from the original recipe (the first time I tried this I stuck to Deb's recipe completely).  One change was by accident...ah well. 

My second attempt was definitely much better and the cake tastes awesome! However, when I went to put it on the serving platter I didn't get the seam down on the bottom so it's kinda lop-sided and when I cut into the cake it cracked on the other side...UGH! I might attempt this a third time but it won't be soon.  Do any of you have tips for jelly/cake rolls? I could sure use them!
the left side should actually be on the bottom


not quite the perfect circle but as you can see I still ate it :)


Heavenly Chocolate Cake Roll
Adapted from: Smitten Kitchen
Printable Recipe

Ingredients:

Cake layer
6 ounces semisweet bittersweet chocolate, chopped or 1 cup semi- or bittersweet chocolate chips
3 tablespoons water or strong coffee*
6 large eggs, at room temperature, separated
2/3 cup sugar
1/4 teaspoon table salt
2 tablespoons unsweetened cocoa powder, divided

Filling
1 cup heavy or whipping cream
2 to 3 tablespoons powdered sugar (use more if you prefer a sweeter filling)
1/2 teaspoon vanilla extract or 1 to 2 tablespoons liqueur of your choice, such as Grand Marnier**

*I used 1/2 tbsp coffee extract & 2 1/2 tbsp water
**I again used 1/2 tbsp coffee extract

Directions:
Preheat oven to 350°F. Butter a 10-by-15-inch shallow baking or jellyroll pan. Line the bottom lengthwise with a piece of waxed or parchment paper (I used waxed) that extends up the short sides one inch.

Melt chocolate with water or coffee in a small saucepan over very low heat until it is 75 percent melted. Remove from heat and stir until the remaining chocolate is smooth. Set aside to cool slightly.
Beat egg yolks with an electric mixer until pale and creamy. Add sugar gradually, and continue to beat until yolks are pale and ribbony. Gently stir the chocolate into the yolk mixture.

In another bowl with clean beaters, beat egg whites with salt until they hold stiff peaks. Stir 1/4 of egg white mixture into the chocolate-yolk mixture to lighten it. Fold the remaining whites into the cake batter in three additions. Pour batter into prepared pan and smooth top. Bake in preheated oven for 15 minutes, or until cake layer feels dry (but very soft) to the touch and a toothpick inserted into the center comes out clean. It will still seem a little underbaked.

Transfer to a cooling rack and cover the top with a light damp towel for 10 minutes. Gently remove towel; it will have a bit of cake stuck to them. Run a knife around the edges of the cake. Sift one tablespoon cocoa over the top of the cake*** and cover the cake with a thin tea towel that is a little longer than the pan. Place the back of a baking sheet or a large flat tray over the towel and invert the cake and paper onto it. Gently peel back the parchment or waxed paper that lined the pan. Sift the remaining tablespoon of cocoa powder over the top of the cake (that was, one minute ago, the underside). Using the towel underneath to help lift and roll the cake, roll the cake from short end to short end with the towel inside. Let cool completely, encased in its towel.

Once cool, beat heavy cream with powdered sugar and vanilla (or other desired extract) until it holds stiff peaks. Get your serving plate ready and place it near your cake roll. Gently unroll chocolate cake and remove tea towel.  Spread whipped cream filling evenly over cake. Gently use waxed or parchment paper once again to reroll cake. Place on serving platter, seam side down.

You can now garnish it with shaved white or dark chocolate or even a drizzle of each, melted; raspberries are pretty too. Serve immediately in 1-inch thick slices or refrigerate until needed. This cake is best to serve on the first day it is made. It’s still delicious after that, but the whipped cream filling does begin to deflate a little into the cake spiral.

***I forgot to sift the cocoa on this side of the cake, but it still turned out just fine. I just added some cocoa to the top after I finished the cake. 


Hop everyone had a lovely weekend!
Kentucky Food Bloggers
Foodbuzz

Search This Blog

 
Designed by Munchkin Land Designs. Copyright 2011. All Rights Reserved.