Showing posts with label Bread. Show all posts

Sunday, November 6, 2011

Cheoreg

This weekend I made Armenian bread, cheoreg.  I don't think I've shared this before but my husband's great grandparents emigrated from Armenia in the early 1900's.  I'm sure if any of you have heard of Armenia it's probably because of the Kardashians (sigh).  I honestly don't know much about the Armenian genocide or Steve's family before they moved to America; below is a short video one of Steve's cousins made for a school project in case you're interested

Since history is truly my first love, I really enjoyed learning how my husband's family came to America and hope to learn more of his family history.  I also plan on learning more about their food, since that's my second love :)

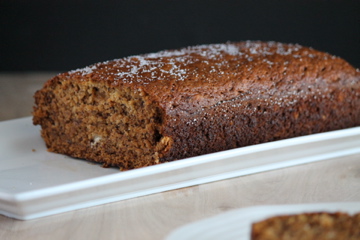
I personally haven't had much Armenian food but I have had his grandmother's cheoreg and it's delicious.  Last year she sent me an Armenian cookbook and I was so super excited to cook out of it. But guess what, I haven't made one thing from it yet....why...FEAR! How can I know if it tastes right if I haven't had it before?  That ended Friday as I attempted my first recipe: cheoreg.  Like far too many of my baking adventures, this one began at 8:30 PM and the dough had to rise 3 hours.  After staying up entirely too late, waiting on the dough, I stuck it in the fridge and made the rolls the next morning.  They were delicious!

Cheoreg
Printable Recipe 

Yield: 5 1/2 dozen rolls

Ingredients:

1 pkg. active dry yeast
1/2 cup warm water
2 1/2 sticks butter
4 tbsp Crisco
2 1/2 cups milk
1 cup & 1 tbsp sugar
3 eggs
1 tbsp. salt
3 tsp baking powder
10 cups flour, sifted, plus 2-4 cups extra flour
Sesame seeds

Directions:

Dissolve yeast in 1/2 cup warm water, with 1 tbsp sugar.

While yeast is dissolving, melt butter and Crisco together in a large pot, add salt.

Warm the milk in a small saucepan and add to the above mixture.

Beat eggs in a small bowl and add sugar.  Then add to above mixture.

Add yeast-water to mixture.

Sift 10 cups flour with baking powder. Gradually (1/2 cup at a time) add the flour to the mixture with a wooden spoon. 

Mix with your hands once dough begins to form and knead until the dough no longer sticks to your hands, adding the extra 2-4 cups flour as needed.

Place dough in a large bowl (the biggest one you have) and cover with a clean kitchen towel.

Allow dough to rise 3 hours or until doubled in size.
Roll small pieces (about 1 inch round balls) into 8 inch strips, the width of your finger.  Shape into figure eights, twists, or knots.
 
Place on a cookie sheet (lined with parchment paper or silpat) and cover with a clean towel.

Allow rolls to rise 1 hour. Then brush with egg wash and sprinkle with sesame seeds.
Bake rolls 15-20 minutes in a 350 degrees F, preheated oven or until tops begin to brown.
Store rolls in an air-tight container at room temperature. You can warm them in the microwave for about 10 seconds.

These rolls are great by themselves, but I love to cut them in half and spread butter and honey on them :)  They are also great with jelly or pumpkin butter!

Since I'm on the topic of family I wanted to share some pictures of my niece and nephews.  Steve's brother and his wife welcomed their second child, Wyatt into the world on Oct 24th and he's just the sweetest baby! Their daughter, Kennedy is the cutest little girl and is loving her "blue baby" as she calls her new brother:
Wyatt
This picture is from back in March when we went on vacation. Steve was teaching Kennedy to jump on the bed :)
And last but certainly not least, Steve's sister has a little boy, Eli. Here he is on Halloween, what a cute elephant he was.
Ya'll didn't think I would post without pictures of my baby, did you? NO WAY!
Greta in earmuffs, this did not go over well
Sweet girl
Hope everyone had a great weekend and don't forget to enter my giveaway.

Tuesday, October 25, 2011

Pumpkin Cinnamon Rolls

 My love for all things pumpkin continues...
I don't know if I've shared this but Stephen doesn't like pumpkin, AT ALL! Although this breaks my heart in one way, it also makes me happy because that means for pumpkin cinnamon rolls for me! :) The downside is that he complains that I make too many pumpkin dishes and he doesn't get anything because he doesn't like pumpkin.  Tough luck, buddy! 

The original recipe is vegan and I had never made anything vegan before.  When I saw this over at Eat, Live, Run I knew this was going to be my first ever vegan dish.  I was wrong :(  I didn't have the vegan butter substitute and I had just went to the grocery that evening and wasn't about to go back.  Besides, I'm not a vegan so I didn't feel bad about using regular butter.  If you want to do this vegan, just use a vegan buttery spread. 

Pumpkin Cinnamon Rolls
Printable Recipe
Source: Eat, Live, Run

Yield: 8 or 9 rolls

Ingredients:

2 tbsp butter
1/3 cup almond milk or regular milk
1/3 cup pumpkin puree
1/4 cup sugar
1 pkg dry yeast
2 cups all purpose flour
1 tsp cinnamon
1/2 tsp salt
1/2 tsp nutmeg
1/4 tsp allspice
1/4 tsp cloves
1/8 tsp ginger

Filling:

1/4 cup brown sugar
2 tbsp butter
2 tsp cinnamon

Glaze:

1 cup powder sugar
1 tbsp almond or regular milk
1/4 tsp vanilla extract

Directions:

Heat milk and butter in a small sauce pan, over low heat.  Heat until butter is melted and milk is warm to the touch. 

Remove from heat and sprinkle yeast into the mixture, stir to dissolve and let sit 5 minutes. Make sure your milk is only warm and not hot or it will kill the yeast.

Whisk flour, salt, cloves, cinnamon, ginger, nutmeg, allspice, and sugar together in a large bowl or bowl of stand mixer.

Add pumpkin to flour mixture and pour in yeast. 

Knead dough by hand 10 minutes or if using a stand mixer, knead with dough hook about 6 minutes.  Dough should be smooth and elastic.

Place dough in a greased bowl and cover with a dish towel.  Sit bowl in a warm place and allow dough to rise 1 hour and 15 minutes.

While dough is rising, make the filling by mixing butter, brown sugar, and cinnamon in a small bowl.

Remove dough to a lightly floured surface and roll out into a large rectangle.

Spread filling over dough, leaving a 1-inch boarder around all four sides.

Gently roll the dough into a log and slice into 1/2 inch slices with a sharp knife.

Place rolls into a greased 9-inch cake pan or pie plate. 

Cover with a dish towel and allow to rise in a warm place 45 minutes.*

Cook rolls in a 350 degrees F preheated oven for 25 minutes or until golden brown.

Allow rolls to cool & make glaze.

Mix powder sugar, milk, and vanilla extract and pour over rolls.

*If you don't want to bake the rolls right away, cover with plastic wrap and keep in refrigerator until ready to bake.  You can bake them straight from the fridge, you don't need to let them come to room temperature.

Sunday, September 18, 2011

Banana Bread

Since today is my good friend, Brittany's Birthday I thought I would share one of her recipes.  Besides, is there any better way to use those overly-ripe bananas but to make a quick bread?  I think not.  If you think you can't cook or bake, you're wrong.  For those of you reading this that feel it takes some sort of supernatural talent to bake or you want to boost your kitchen confidence...make this bread!  I'm telling you it's the easiest thing and it never fails! 

This is my friend, Brittany's recipe for banana bread but I added cinnamon to mine-which is why it's a little darker than normal banana bread.  The bread is great without cinnamon but since I love it so much, I add it to just about everything I bake.  :) You can also add walnuts to this recipe but I really prefer it without, but that's just me. 

Banana bread is something I like for breakfast, with my lunch, or for dessert :) It's very versatile in my opinion.  My favorite is to barely warm it in the microwave and spread some cream cheese on top...YUMMY!


Banana Bread   
Printable Recipe

Yield: 1 loaf

Ingredients:

3 or 4 ripe bananas, mashed
1/3 cup melted butter
1 cup sugar
1 egg, beaten
1 tsp vanilla
1 tsp baking soda
1 tbsp cinnamon(optional)
pinch of salt
1 1/2 cups flour (all purpose)

Directions:

Preheat oven 350 degrees F.

Prepare loaf pan by spray with non-stick spray.  I also line the bottom of mine with parchment paper.

Mix all ingredients with a wooden spoon*, adding flour last.

Bake for 1 hour or until toothpick comes out clean when inserted in the middle.

Allow bread to cool completely before inverting pan onto a plate then sprinkle a little sugar on top for some extra sweetness.  

*I'm not sure if using a wooden spoon really matters because I've never tried it without :) It's just one of things where I know the wooden spoon always works so why take a chance.  Next to my iron skillet, a wooden spoon is probably my next invaluable kitchen tool.  If for some crazy reason you don't have one, go get one!

Tuesday, July 5, 2011

Zucchini Bread

 
One of the many reasons I love summer is because of the amazing fresh produce :) I love how everyone's gardens start to produce fruits and veggies and most gardeners I know are more than willing to give you FREE stuff! I love free, don't you?  My mom's friends gave her some zucchini because their garden is producing far more than their family needs.  Mom said she was going to make bread with hers and after she gave me 2 HUGE zucchini I decided to do the same and I'm so glad I did.  Zucchini bread is so simple and yet so satisfying.  My favorite is to smear some cream cheese on a slice :) YUM!!

 These zucchini (wishing I had taken a picture before shredding them) were so large that I had 5 cups and only needed 2 cups for two loaves of bread. What did I do? Stuck them in the freezer for another day. If you don't have a food processor you can certainly grate zucchini by hand (I've done so several times) but if you do have a food processor it takes 15 seconds at most to get these babies shredded and ready for baking. Have I mentioned how much I love my food processor? I LOVE IT! It was a gift from my in-laws for Christmas this past year and I have already gotten their money's worth :) HEHE. It's so wonderful for so many things: making sauces, grating hard cheeses, veggies, etc. Oh, and it makes pie crusts a breeze! I've also made many a smoothie - practically retired my blender. A blender is too noisy anyway, right? Is anyone in need of a blender? I might be getting rid of mine-I've only used to twice I think and NONE since getting my food processor :) Did I mention I love my processor? HA.

pure beauty

Anyway, back to the bread....the recipe I used is pretty basic and yet so so good.  The bread comes out nice and moist (my bread MUST be moist) and I love the hint of cinnamon you can taste-so good!  This is such a "quick" bread, it only takes 5-10 minutes before you're reading to pop the bread into the oven for baking. 

 This bread, along with others like it (banana bread, pumpkin bread, etc) are good for breakfast, lunch, dinner, a midnight snack-pretty much any time of day you're hungry! I really enjoy having things like zucchini bread on hand because it makes me feel much better to go grab a slice of bread (even with cream cheese on top) than a bag of chips or candy. And since zucchini is a vegetable, it's totally healthy and fat free, RIGHT? Who's with me? I love nothing more than a good slice of bread and coffee in the morning for breakfast on a weekend....

Zucchini Bread   

Source: The Taste of Home Cookbook  (pg. 506)

Printable Recipe 

Ingredients:

3 cups all-purpose flour
2 cups sugar
1 tsp salt
1 tsp baking soda
1/4 tsp baking powder
3 eggs
1 cup canola oil
2 tsp vanilla extract
1 tsp ground cinnamon
zest of 1/2 lemon
2 cups shredded zucchini (about 2 medium sized zucchini)

Directions:

Preheat oven to 350 degrees F & prepare 2 8x4x2 loaf pans-well greased.

In a large bowl, combine: flour, sugar, salt, baking soda, baking powder.

In a small bowl whisk: eggs, oil, vanilla, cinnamon, and lemon zest.

Stir into dry ingredients until moistened then fold in zucchini.

Transfer to 2 greased loaf pans and bake 55-65 minutes or until cake tester or toothpick comes out clean from the center of bread.*

Cool in pan for 10 minutes then remove until cool rack and allow to cool completely before serving.

Go make this and ENJOY!

*Next time I make this I will only use 1 loaf pan. I have one loaf pan that is a bit larger than the standard size so I will just use that. This bread turned out great but the loaves were very small-about 1 1/2vinches in height and I really like my breads a bit bigger than that.


Monday, April 18, 2011

Cream Cheese Cinnamon Rolls

After several failed attempts at one cinnamon roll recipe (I'm not going to say which one b/c it's supposed to be a no-fail amazing recipe) I finally threw in the towel and went on the hunt for another one-one that I could make! HA!  I don't know what my problem had been, I followed the directions exactly as they were printed in my cookbook but after four failed attempts, and 2 full bags of flour wasted, I gave up.  I don't like giving up, especially not on a recipe, I will usually keep trying until I have it mastered but this time it was just too much.  I found this great recipe on a favorite blog of mine Joy the Baker.  If you haven't checked it out, you need to...RIGHT NOW :) I did a little bit of editing to suite my tastes and what I had on hand and these were a HUGE success!

These cinnamon rolls makes a great breakfast, better snack, or good supper :) If you're into eating sweets as a meal, which I am.

Warning: If you make these, your kitchen might look like a war zone-or maybe only mine did:


The mess is worth it, trust me!

Cream Cheese Cinnamon Rolls

Adapted from Joy The Baker
Printable Recipe 


For the Dough:
1 1/4oz package active dry yeast
1/2 teaspoon, plus 1/4 cup sugar
1/2 cup milk at room temperature
2 Tablespoons light brown sugar
1/2 teaspoon vanilla extract
1 egg
1 egg yolk
2 3/4 cups all-purpose flour, sifted, plus more for kneading
3/4 teaspoon salt
8 Tablespoons (1 stick) unsalted butter, at room temperature, plus more for the pan

For the Filling:
1/2 cup sugar
1/4 cup dark brown sugar
1 Tablespoon ground cinnamon
1/2 teaspoon salt
1/8 teaspoon ground cloves
2 Tablespoons maple syrup
4 oz. cream cheese, at room temperature
8 Tablespoons (1 stick) unsalted butter, melted

For the Icing:
2 cups confectioners' sugar
1/4 cup buttermilk
2 tbsp. heavy whipping cream

Making the Dough:
In the bowl of a stand mixer combine yeast, 1/2 teaspoon sugar and 1/4 cup water heated to 115 degrees F.  Stir to combine and let sit until frothy and foamy, about 10 minutes.

Add remaining sugar, milk, light brown sugar, vanilla, egg, and egg yolk.  Beat with a wire whisk until well combined.  Fit the bowl onto the mixer, fitting with the dough hook attachment.  Add the flour and salt and mix on medium speed until the dough just begins to come together.  Turn the machine on medium-high and knead the dough for 4 minutes.

Add the butter and continue to knead for about 6 minutes.  The dough will the wet and sticky.  Place the dough on a well floured work surface, and knead about 1/3 cup all-purpose flour into the dough.  Don't worry, the dough still might be a little sticky. Just set the dough to rest in a large greased bowl.  Cover the bowl with plastic wrap and a kitchen towel and allow to rise in a warm place for 1 1/2 to 2 hours, or until doubled in size.

While the dough rises, make the filling.  Combine the sugar, dark brown sugar, cinnamon, salt and cloves in a large bowl.  Stir to combine.  Stir in the maple syrup.  Set aside.

When the dough has doubled in size, dump if from the bowl onto a heavily floured work surface.  Gently knead the dough until it is no longer sticky, adding more flour as needed.  I think I added about 3 Tablespoons of flour.  Work the dough for about 1 or 2 minutes.  Once it's no longer sticky, place a kitchen towel over the dough and let rest for 5 minutes before you roll it out.

Using a floured rolling pin, roll the dough into a 10 x 10-inch square.

In a small bowl, mix the cream cheese with a knife until it's smooth and spreadable.
Spread the cream cheese evenly over the dough square.  Fold the square into thirds like you would fold a letter to fit into an envelope.  Take the open ends of the rectangle and fold into thirds again, to make a smaller dough square.

Invert the dough so that the seam is face down and, using the rolling pin, gently roll it into a 10 x 20-inch rectangle.  You make find that some cream cheese sneaks through.  Be as gently as possible with the dough, but continue to work it until you reach the size you need.

Turn the dough so that the short sides are parallel to you.  You're going to roll from the short sides of the dough.

Brush the top of the dough with half of the melted butter.  We'll use the rest of the butter after the rolls are baked.

Pour all of the filling onto the dough.  Spread evenly, leaving a 1-inch boarder at one of the short edges of the dough so the roll can be properly sealed.  Lightly press the filling into the dough.

Using your hands, lift up the bottom edge of the dough and roll it forward into a tight cylinder.  Place dough cylinder seam side down on a cutting board.  Using a sharp, thin knife, trim off the uneven edges.


pre-baking
 Heat the oven to 375 degrees F.  Uncover the rolls.  If you refrigerated the rolls (this is what I did), let them sit at room temperature for 15 minutes before baking.  Bake until golden brown and a toothpick inserted in the center comes out clean, about 30 minutes.

Make the icing:  While the rolls are baking, whisk together the sugar and buttermilk in a small bowl until smooth, then add heavy cream if desired. 
Transfer the pan of cinnamon rolls to a cooling rack.  Brush with remaining butter.  Let cool for 5 minutes.  Dip the tines of a fork into the icing and drizzle over the rolls.  Serve immediately.

 SO YUMMY! A special thanks to my baking buddy: Greta, without her assistance, I could bake in peace ;)

Saturday, April 2, 2011

Pizza

I forgot to take a picture before eating the first piece, opps!

I always thought homemade pizza was really hard and time consuming, so I never tried it. I was WRONG! So, very very wrong! - And, I couldn't be happier.  I made the pizza dough the night before, tossed one in the freezer for later and the other in the refrigerator until the next evening.  I made the pizza sauce while the oven was preheating (it look longer for me to gather the ingredients from the pantry than it took to actually make). I love pepperoni so I kept the toppings simple with those and fresh mozzarella.   

You can be so creative when it comes to pizza: meats, veggies, fruits, whatever you like you just toss on top and enjoy after baking. Now that I know how fast and easy this is, we will be having many pizza nights at our home.  The best part about this pizza wasn't how simple it was to make but that it's cheaper and better than delivery pizza!! If you don't believe me, please TRY to prove me wrong by making your own. I'll even pay for your next delivery pizza if you don't agree ;)


Perfect circles are over-rated :)
Pizza Dough
Source: Annie's Eats
Printable Recipe
(makes enough for 2 pizzas)

Ingredients:
1/2 cup warm water
1 envelope instant yeast
4 cups bread flour
1 1/2 tsp salt
1 1/4 water, room temp
2 tbsp extra-virgin olive oil

Directions:

Measure warm water into a 2 cup liquid measuring cup, then add yeast.  In the bowl of your stand mixer (using paddle attachment), combine bread flour with salt and mix briefly to blend. 
Measure the room temp. water into the measuring cup with the yeast/water mixture.  With your stand mixer on low speed, add the yeast/water mixture and olive oil. 
Mix until dough is formed.
Change paddle attachment to kneading hook and knead on low speed until smooth and elastic, this takes about 5 minutes. 
Transfer to a lightly oiled bowl, turn the dough once to coat.
Cover with plastic wrap and let sit 1 1/2 hours or until doubled in size


Deflate the dough by pressing down with your hands.  Transfer dough to a lightly floured work surface. 
Divide the dough into two equal pieces.  Form each piece into a smooth ball. If you are only making once pizza, wrap the other dough ball in plastic and freeze.
Cover with damp cloth and let dough relax 10 minutes, no longer than 30 minutes.

To bake, preheat oven and pizza stone (if using) 500 degrees F for at least 30 minutes.  If not using a pizza stone, you don't need to preheat this long (I didn't use a pizza stone). 
Transfer dough to lightly floured surface and shape into circle or rectangle (or any shape you like). 
Brush outer edge with a little olive oil
Add your desired toppings and bake 8-12 minutes or until golden brown. 


*I also turned the broiler on the last 2 minutes to crisp my cheese and pepperonis
** You don't HAVE to have a stand mixer, this can all be done the old fashioned way, BY HAND! Heck, kneading is actually kinda fun ;)


Pizza Sauce
Source: What Megan's Making
Printable Recipe 


Ingredients:
1 (28oz) can whole, peeled tomatoes, drained (toss the liquid)
2 tbsp tomato paste
1 tbsp extra-virgin olive oil
1 tsp red wine vinegar
2-4 garlic cloves, minced (depending on your love of garlic)
1 tsp salt
1 tsp dried oregano
1/4 tsp black pepper


Place all ingredients in food processor (or blender) except tomato paste and process bout 30 seconds, until smooth.  Add tomato paste to thicken sauce if desired.
Refrigerate until ready for use

I like a good, cheesy, MESSY piece
 Hope everyone has an amazing weekend! GO CATS, we are playing UCONN in the final four tonight :)

Tuesday, March 29, 2011

Surprise Monkey Bread

 
 Do you have a favorite recipe that you don't even use a recipe for? If I had to choose one go-to dessert (this could be breakfast too, or lunch or dinner, hehe) that I no longer read the actual recipe for it would be this yummy ring of goodness!  I first made this for a snack party at my former job and it was an instant hit. In fact, at every snack party I was asked to bring this.  I was watching TV tonight with my hubby and it hit me....MONKEY BREAD, MUST MAKE NOW!  So, I headed to the kitchen and whipped this up.  I had to find the original recipe in order to post.  Although I use the same ingredients the amounts tend to change and vary each time I make this depending on my mood. Shall I add more brown sugar, more cinnamon, no walnuts, etc...you get the idea.  You could really add or omit any of the ingredients depending on your personal tastes, another reason I love this so much....adaptability (is that even a word?)
Ingredients
Depending on what's in the frig, I sometimes use extra flaky buttermilk biscuits, grands, really just whatever I have on hand.  Sometimes I don't have walnuts, chopped peanuts are nice as well.  So is caramel sauce instead of brown sugar/butter combo.  Although this is a pretty good treat warmed up the next day, if I'm taking this to work or a social gathering there are NEVER leftovers.  So, if you want to take this somewhere and want to have some yourself, just make two :)

Another reason I love this, as if I need another reason aside from the brown sugar, cinnamon/sugar combo (so delish) is that if you don't like cream cheese, or you THINK you don't, you will change your mind after this.  My step-dad claims to loath cream cheese, as did many of my fellow co-workers.  When asked what the "surprise" component was, a HUGE, yet evil grin came to my lips as I stated. "That would be cream cheese, a whole brick of it!" YAY, score for cream cheese! I personally LOVE cream cheese and often spent many summer lunches in the kitchen making cream cheese and olive sandwiches with my Grandmother, but that's another story for another day.  

So, go ahead and make this. You can thank me now or later, I'm not picky ;)

Surprise Monkey Bread
Printable Recipe

Source:  Taste of Home Prize Winning Recipes, April 2010
Ingredients:

1 cup packed brown sugar
1/2 cup butter, cubed
2 tubes refrigerated biscuits
1/2 cup sugar
1 tbsp ground cinnamon
1 package (8 oz) cream cheese, cut into 20 cubes (if each biscuit tube has 10 biscuits)
1-1/2 cups chopped walnuts (optional)

Preheat oven 350 degrees F

Melt butter and brown sugar in a microwave-safe bowl until the sugar is dissolved.  I start on 2 minutes on 50% power and then go longer in 30 second increments.  Set aside. 
brown sugar & butter
Combine cinnamon and sugar, set aside.

Flatten each biscuit into a 3 inch circle and sprinkle 1/2 tsp of cinnamon/sugar mixture in the middle of the circle and spread so the whole biscuit is covered.  Top with 1 cream cheese cube then fold dough over filling; pinch edges to seal tightly. 

Sprinkle 1/2 cup walnuts into a 10 inch fluted tube pan coated with non-stick cooking spray.  Layer with half the biscuits, cinnamon/sugar mixture, & butter/brown sugar mixture and 1/2 cup walnuts.  Repeat layers.
 
layer one


add brown sugar/butter mixture
layer two


Bake 40-45 minutes or until golden brown, invert pan onto serving dish and enjoy! Best served warm

Oh, so yummy.

Sunday, March 20, 2011

Light Wheat Sandwich Bread


 I'm not a great bread maker, at least not yet.  One cause for this may be lack of patients. All the waiting for the bread to rise and then rise again, and again! UGH, not for me!  The other issue I have is that I get the baking urge around 10:00 pm.  It's hard to start making bread at such a late hour and be able to do all that waiting I was talking about.  Just like always, last night at 9:30 I felt the need to bake this wonderful wheat bread I saw over at Cook Like a Champion.  Instead of trying to hurry the process along I just stopped right before the actual baking and put my dough in the refrigerator until this morning.  However, it wasn't too fun allowing the bread dough to come to room temperature until I could actually bake.  Like most things, it was worth the wait and although my bread did not look perfect, it tastes pretty darn good!  I was proud of my first wheat bread attempt :)

flour


Light Wheat Sandwich Bread
Printable Recipe 
from Cook Like a Champion

Ingredients:

  • 2 1/2 cups unbleached bread flour
  • 1 1/2 cups whole-wheat flour
  • 1 1/2 tbsp honey
  • 1 1/2 tsp salt
  • 3 tbsp powdered milk
  • 1 1/2 tsp instant yeast
  • 2 tbsp shortening, at room temp
  • 1 1/4 cups water, at room temp 

Directions:


In stand-mixer bowl, using paddle attachment, stir together flours, honey, salt, powdered milk, and the yeast.  Add the shortening, and water.  Mix on low speed until the ingredients from a ball.  The dough will be soft and supple.

Change from the paddle attachment to the dough hook and knead on medium speed 6 minutes.
Kneading is so easy with my mixer :)
Sprinkle your work surface with flour and knead for about 10 minutes, you can add a little flour if needed.  The dough should be tacky but not sticky.

Lightly oil a large bowl and place dough inside, turn the dough to coat with oil then cover with plastic wrap and allow to rise 1 1/2 to 2 hours or until dough has doubled in size.

Remove dough and make a rectangle 5 inches wide and 6-8 inches long.  Working from the short side, roll up the length one section at a time, pinching the crease after every turn.

The loaf will spread as you roll and the final length should be 8-9 inches. Make sure to pinch the final seam closed then roll the dough back and forth so it evens out.


Put the loaf in a lightly oiled pan, make sure the ends of the loaf touch the pan. Spray the top of the dough lightly with oil.  Cover with plastic wrap and allow to rise for 90 minutes.

Preheat oven 350 degrees F and place on the middle rack of oven.

Bake for 25 minutes then rotate the loaf pan 180 degrees and bake 20-30 minutes. The top and sides will be golden brown and the center of the loaf should be 190 degrees F.

Remove from pan and allow to cool 1-2 hours before serving.

Store in plastic wrap or paper bag in a dark, cool place for about 3 days.


If refrigerated the bread will dry out, no one wants that!
Finished Product

Saturday, March 19, 2011

Cinamon Sugar Pull-Apart Bread


If you want a simple yet delicious treat MAKE THIS! Not next week, tomorrow, or even in an hour, make it right now.  It's that good, trust me (I ate the whole loaf myself, well almost).  I was browsing through some of my favorite food blogs and when I saw this over at Joy The Baker I knew it was going to be a match made in heaven.  If you don't know me then you don't know about my love affair with cinnamon & sugar.  I love almost anything that is made with these two ingredients. This is now a new favorite.

Cinnamon Sugar Pull-Apart Bread
 Printable Recipe
source: Joy the Baker 
*The only change I made was leaving out the nutmeg 

Dough:
  • 2 3/4 cups plus 2 tablespoons all-purpose flour
  • 1/4 cup granulated sugar
  • 2 1/4 teaspoons active dry yeast
  • 1/2 teaspoon salt
  • 2 ounces unsalted butter
  • 1/3 cup whole milk
  • 1/4 cup water
  • 2 large eggs, at room temperature
  • 1 teaspoon pure vanilla extract
 Filling:
  • 1 cup granulated sugar
  • 2 teaspoons ground cinnamon
  • 2 ounces unsalted butter, melted until browned


In a large mixing bowl whisk together 2 cups flour, sugar, yeast, and salt.  Set aside.
Whisk together eggs and set aside.

In a small saucepan, melt milk and butter until butter has just melted.  Remove from the heat and add water and vanilla extract. 

 Let mixture stand for a minute or two, or until the mixture registers between 115 to 125 degrees F.

Pour the milk mixture into the dry ingredients and mix.  Add the eggs and stir the mixture until the eggs are incorporated into the batter.  The eggs will feel soupy and will seem like the dough and the eggs are never going to come together.  Keep up the stirring, it will come together.  Add the remaining 3/4 cup of flour and stir for about 2 minutes.  The mixture will be sticky.  

Place the dough is a large,  greased bowl.  Cover with plastic wrap and a clean kitchen towel.  Place in a warm space and allow to rest about 1 hour, or until dough is double in size.  *The dough can be risen until doubled in size, then refrigerated overnight for use in the morning.  If you do this, let the dough rest on the counter for 30 minutes before following the roll-out directions below.

While the dough rises, whisk together the sugar, cinnamon. Set aside.  

Melt 2 ounces of butter until browned.  Set aside.  Grease and flour a 9x5x3-inch  loaf pan.  Set aside.

Deflate the risen dough and knead about 2 tablespoons of flour into the dough.  Cover with a clean kitchen towel and let rest for 5 minutes.  On a lightly floured work surface, use a rolling pin to roll the dough out.  The dough should be 12-inches tall and about 20-inches long.  If you can't get the dough to 20-inches long... that's okay.  Just roll it as large as the dough will go.  Spread melted butter across all of the dough.  Sprinkle with all of the sugar and cinnamon mixture.  

Slice the dough vertically, into six equal-sized strips.  Stack the strips on top of one another and slice the stack into six equal slices once again.  You'll have six stacks of six squares.  Layer the dough squares in the loaf pan like a flip-book.  Place a kitchen towel over the loaf pan and allow in a warm place for 30 to 45 minutes or until almost doubled in size.   

Place a rack in the center of the oven and preheat to 350 degrees F.  Place loaf in the oven and bake for 30 to 35 minutes, until the top is very golden brown.  The top may be lightly browned, but the center may still be raw.  A nice, dark, golden brown will ensure that the center is cooked as well.  

Remove from the oven and allow to rest for 20 to 30 minutes.   Run a butter knife around the edges of the pan to loosen the bread and invert onto  a clean board.  Place a plate (or whatever you wish to display this yummy loaf ) on top of the  upside down loaf, and carefully invert so it's right side up. 

*Try not to eat the whole loaf in one sitting, if you can resist! :) 
Kentucky Food Bloggers
Foodbuzz

Search This Blog

 
Designed by Munchkin Land Designs. Copyright 2011. All Rights Reserved.